Discovering a leak in your sump pump pipe can be a cause for concern, as it can lead to water damage and disrupt the functioning of your sump pump system. In this concise and informative article, we will guide you through the necessary steps to fix a leaky sump pump pipe. By following our professional advice and utilizing the proper techniques, you can restore the integrity of your sump pump system and ensure its efficient operation for years to come.
Key Takeaways
- Thoroughly inspect the pipe and its connections for cracks, holes, or loose fittings.
- Locate the power source of the sump pump and disconnect it to stop the flow of water.
- Drain the sump pump pit by attaching a hose to the drain valve and directing the water away from the building’s foundation.
- Apply a reliable waterproof sealant or repair tape to the leaking area, and test the repair by filling the sump pit with water and observing for any signs of leakage.
Identify the Source of the Leak
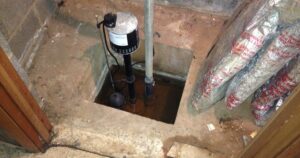
To begin resolving a leaky sump pump pipe, it is essential to first identify the exact source of the leak by thoroughly inspecting the pipe and its connections. This step is crucial as it allows for an accurate diagnosis of the issue and facilitates the selection of the appropriate repair method. When inspecting the pipe, pay close attention to any visible cracks, holes, or loose fittings.
Check the connections between the pipe and the sump pump, ensuring they are tightly secured and free from any signs of leakage. It may be necessary to remove any insulation or covering around the pipe to conduct a thorough examination. By diligently examining the pipe and its connections, the precise location of the leak can be determined, enabling an effective resolution to be implemented.
Turn off the Sump Pump
To properly address the leak in the sump pump pipe, it is crucial to turn off the sump pump before proceeding with any repairs. Turning off the sump pump ensures that there is no water flowing through the pipe, making it easier and safer to fix the leak. To turn off the sump pump, locate the power source and disconnect it.
This may involve unplugging the pump from an electrical outlet or shutting off the circuit breaker that supplies power to the pump. It is important to follow proper safety procedures when handling electrical equipment. By turning off the sump pump, you can effectively stop the flow of water and prevent any further damage or flooding.
Drain the Sump Pump Pit
Before starting any repair work on the sump pump pit, it is essential to ensure that the pit is empty. You might be wondering, “Is sump pump smell toxic?” To answer that question, it’s crucial to address any lingering odors or unusual scents in the pit as they could potentially indicate the presence of harmful substances. However, the first step remains the same: ensure the pit is drained to prepare for repairing the leaky pipe.
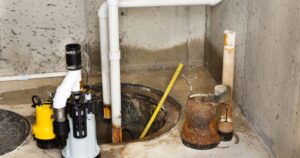
To drain the sump pump pit, begin by disconnecting the pump from the power source. This will prevent any accidental activation during the process. Next, locate the pit’s drain valve, which is typically located at the bottom of the pit. Attach a hose to the valve, ensuring a secure connection. Position the other end of the hose in a safe area away from the foundation of the building.
Open the drain valve and allow the water to flow out of the pit. Depending on the amount of water present, this process may take some time. Once the pit is fully drained, you can proceed with the necessary repairs to the leaky pipe.
Remember to exercise caution while working in the pit, as it may contain debris or standing water. Wear appropriate protective gear and follow safety guidelines to ensure a successful repair.
Inspect the Pipe for Cracks or Damage
After draining the sump pump pit, it is important to thoroughly inspect the pipe for any cracks or damage. The pipe plays a crucial role in directing water away from your home’s foundation, so any issues can lead to leaks and potential flooding. Begin by visually examining the entire length of the pipe, looking for visible cracks, holes, or signs of wear.
Run your hand along the pipe to feel for any irregularities or rough spots. If you come across any cracks or damage, it is imperative to address them promptly. Depending on the severity, you may be able to patch minor cracks with epoxy or use a rubber coupling to replace a damaged section. However, for major damage, it is recommended to consult a professional plumber to ensure a proper and lasting repair.
Clean and Prepare the Pipe for Repair
After inspecting the sump pump pipe for cracks or damage, the next step in fixing a leaky sump pump pipe is to clean and prepare the pipe for repair. Cleaning the pipe is essential to ensure proper adhesion of the repair materials. Start by removing any debris or dirt from the pipe using a wire brush or a damp cloth.
Make sure to clean both the inside and outside of the pipe thoroughly. Once the pipe is clean, it is important to roughen the surface to enhance the bonding of the repair material. This can be done by sanding the pipe lightly with sandpaper or using a coarse wire brush. After cleaning and roughening the pipe, it is now ready for the repair process.
Apply a Waterproof Sealant or Repair Tape
To address the leak in the sump pump pipe, it is crucial to apply a reliable waterproof sealant or repair tape. This step is vital in preventing further damage and ensuring the efficient operation of the sump pump system. A waterproof sealant, such as silicone or polyurethane, can be applied to the leaking area of the pipe. These sealants are known for their excellent adhesion properties and ability to withstand water pressure.
Repair tapes made from durable materials like rubber or PVC can also be used to effectively seal the leak. It is important to carefully follow the manufacturer’s instructions when applying the sealant or repair tape to guarantee a proper and long-lasting seal. By applying a waterproof sealant or repair tape, you can effectively fix the leak in the sump pump pipe and maintain the functionality of your sump pump system.
Test the Repair and Check for Any Additional Leaks
Having applied a waterproof sealant or repair tape to the leaking area of the sump pump pipe, it is now necessary to test the repair and thoroughly check for any additional leaks. To do this, fill the sump pit with water until the sump pump activates. Observe the repaired area closely for any signs of leakage.
If you notice any new leaks, you may need to reapply the sealant or repair tape or consider other solutions such as replacing the damaged section of the pipe. It is crucial to ensure that the repair is effective and that no further leaks occur. Once you are satisfied with the repair, you can move on to regularly maintaining and inspecting your sump pump system to prevent future issues.
Regularly Maintain and Inspect Your Sump Pump System
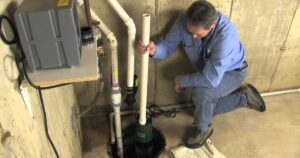
Maintaining and inspecting your sump pump system regularly is essential for preventing future issues. By conducting regular maintenance and inspections, you can identify any potential problems before they escalate into costly repairs or complete system failure. Begin by checking the power source and ensuring it is properly connected.
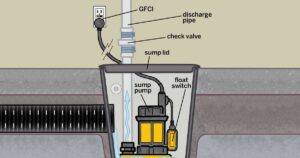
Inspect the sump pump for any signs of wear, such as frayed wires or loose connections. Clear any debris that may have accumulated in the sump pit, as this can interfere with the pump’s performance. Test the float switch to ensure it is functioning correctly. Inspect the discharge pipe for any leaks or blockages. By regularly maintaining and inspecting your sump pump system, you can ensure its optimal performance and prolong its lifespan.
Frequently Asked Questions
How Do I Know if My Sump Pump Pipe Is Leaking?
To determine if a sump pump pipe is leaking, inspect for visible signs of water accumulation or dampness around the pipe joints or connections. Additionally, monitor the sump pump’s performance, listen for unusual sounds, and check for any water pooling in the area.
Can I Fix a Leaky Sump Pump Pipe Myself, or Should I Hire a Professional?
When it comes to fixing a leaky sump pump pipe, it is important to consider the complexity of the issue and your own skills. Hiring a professional may ensure a proper fix and provide peace of mind.
What Type of Waterproof Sealant or Repair Tape Is Recommended for Fixing a Leaky Sump Pump Pipe?
For fixing a leaky sump pump pipe, it is recommended to use a waterproof sealant or repair tape specifically designed for plumbing applications. These products provide a reliable and long-lasting solution to prevent further water leakage.
How Often Should I Inspect and Maintain My Sump Pump System to Prevent Leaks?
Regular inspection and maintenance of your sump pump system is crucial to prevent leaks. Follow manufacturer’s guidelines for frequency, but a general rule of thumb is to inspect and maintain your system at least once a year.
Are There Any Specific Safety Precautions I Should Take When Repairing a Leaky Sump Pump Pipe?
When repairing a leaky sump pump pipe, it is crucial to prioritize safety. This includes turning off the power supply, wearing protective gear, and following proper procedures to prevent injuries and further damage.
Conclusion
In conclusion, fixing a leaky sump pump pipe requires identifying the source of the leak, turning off the pump, draining the pit, inspecting the pipe for damage, cleaning and preparing it for repair, applying a waterproof sealant or repair tape, testing the repair, and regularly maintaining and inspecting the system. By following these steps, homeowners can ensure their sump pump operates effectively and prevent any further leaks or damages.